
Print Specifications

Fineline Printing Group’s goal is to provide customers with the highest quality product at the lowest cost—as quick as possible. Ensure that the artwork transfer process goes smoothly and efficiently by following these guidelines. And, remember that your Fineline representative can answer questions as you develop your artwork.
File Formats Accepted
Please Note: Most file types and versions are accepted, however an artwork processing fee may apply to those formats not listed here.
- InDesign
- Photoshop
- Illustrator
- Acrobat
- Quark
Artwork Development Settings
Page Setup
- Set all pages—including crossovers–—as facing pages and not as reader spreads.
- Set all files to final trim size.
- Apply the correct page count.
- Set bleeds at 1/8” (.125”). A document has bleeds when the content has been extended past the trim edge of the document.
Color
- Rich Black should be built as (40-Cyan and 100-Black).
- Convert all RGB images and graphics to CMYK process.
- Convert all Spot PMS colors to process unless you are printing as a spot color.
- Do not use images in RGB, LAB, or Indexed color, regardless of job specifications. These modes will not convert to CMYK reliably and will have potential color variation.
- Remove all unused colors from the swatch pallette.
- Match all colors in your document to your estimate and/or file instructions. (For example: If you have requested a two-color job, please make sure that your artwork reflects this number of colors).
Images and Graphics
- Save all vector graphics as an illustrator EPS.
- RGB photoshop images should be converted to CMYK.
- High resolution images are at least 300 dpi. 72 dpi is considered low resolustion (dpi = ppi pixels per inch).
- Please note that once images are placed into the document, resolution cannot be adjusted. Resolution must come from the properties of the original image’s file. If the image has too low of a resolution, the final printed product will not look as clean or as crisp as a file that has followed these guidelines.
Fonts
- Send fonts used in vector images with the files or convert fonts to outlines before finalizing the document. Note, while Fineline has access to many fonts, we cannot guarantee an exact match to the font you used unless you provide the font in either method cited above.
- Send all fonts when sending an open document artwork file. Always compress or “zip” (using applications like Stuffit, etc.) fonts and files when sending them via e-mail or FTP (file transfer protocol).
- Always package fonts with files and links.
(See instructions for packaging InDesign files below)
Submitting Your Artwork
- Always send a hard copy of all pages submitted to Fineline. (If you are submitting your artwork via FTP, please email a PDF or fax a hard copy to your Fineline representative. Or, if you are submitting open artwork, include a PDF.)
- Use e-mail for smaller file submissions. Avoid email submissions of 5mb or larger.
- FTP can be used for any size compressed file. You will need to contact your Fineline representative for access to the FTP.
Saving InDesign Files as PDFs
Click on images to enlarge
>Choose File > Export
- Specify a name and location for the file
- Specify format as “Adobe PDF”
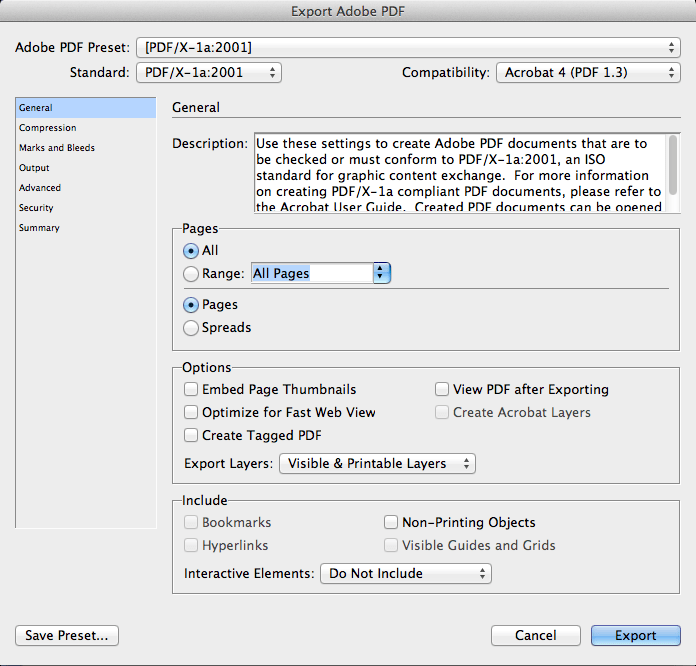
>In the Export Adobe PDF box, under General:
- Specify Adobe PDF Preset
- Specify Standard
- Specify Compatibility
(Use PDF_x1A as a default custom setup)
- Specify which pages you want to convert to PDF; “All” or selected pages
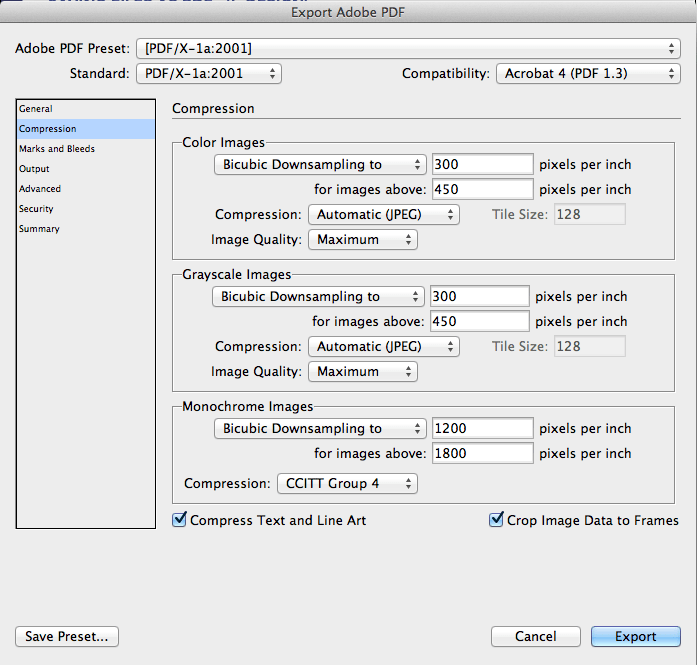
>Under Compression:
- Use the settings as shown:
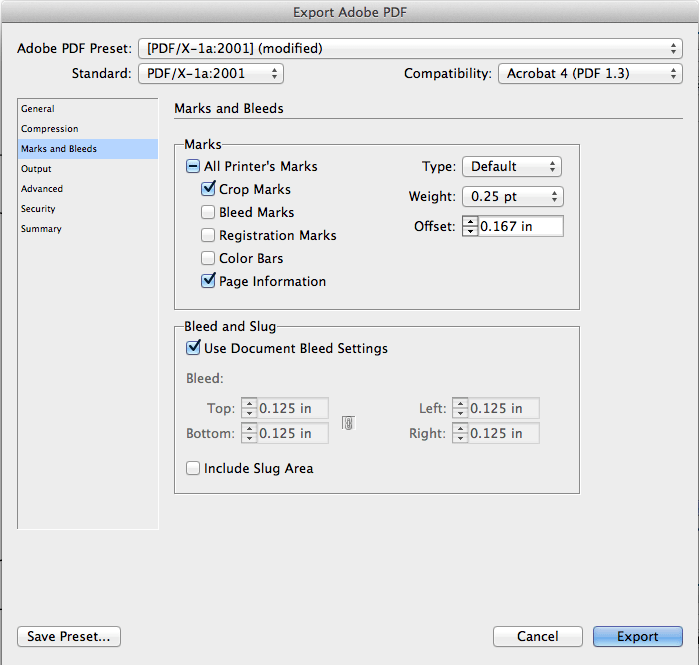
>Under Marks and Bleeds:
With Bleeds:
- Check “Crop Marks” Box
- Check “Use Document Bleed Settings”
(Bleeds will set to: “0.125 in”)
- Uncheck “Include Slug Area”
Without Bleeds:
- Only check “Page Information”
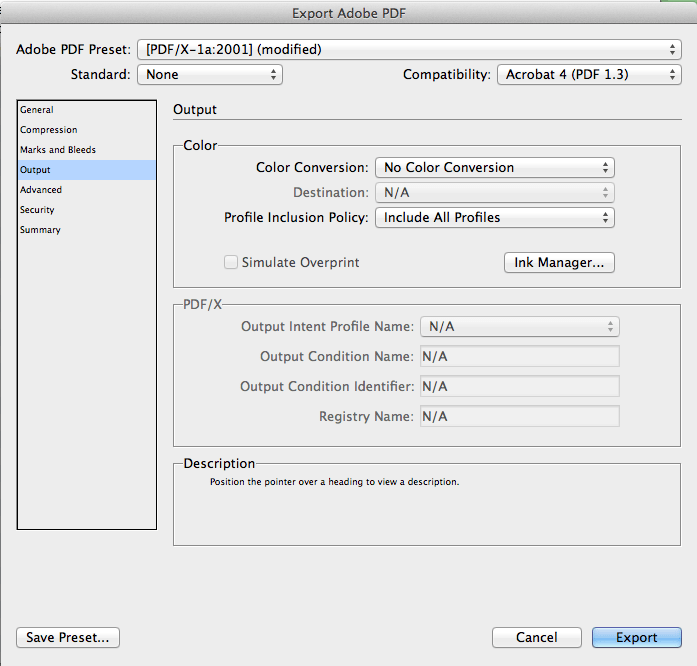
>Under Output:
- Specify Color Conversion: “No Color Conversion”
- Specify Profile Inclusion Policy: “Include All Profiles”
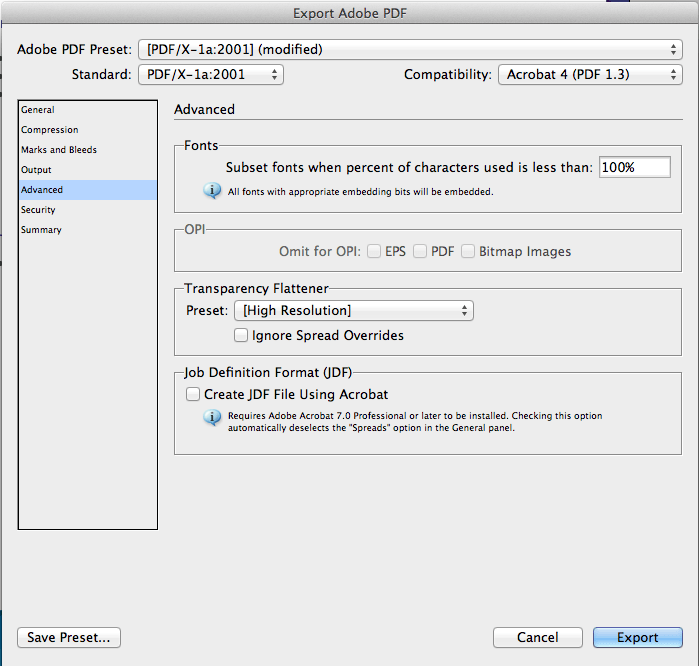
>Under Advanced:
- In the Fonts Box, change subset font percentage to 100%
- In the OPI Box, Uncheck any boxes
- Uncheck “Create JDF File Using Acrobat”
>Under Security:
- Unless your file needs to be password protected or you want certain editing/printing features disabled, all boxes should be unchecked.
>Click Export when finished
Collecting/Packaging InDesign Files
Any jobs that get sent to Printing Services with missing fonts or images will be sent back. Once you are finished designing your file, follow these steps when packaging your files.
Click on images to enlarge
- Go to File menu > Package (See A)
- Click Continue to go past instructions
- Create New Folder with “Job Name” + “Collected”(ex. SampleJobCollected)
- Check first three boxes (See B)
- Click Package. If a font warning box pops up after clicking save, click OK to continue packaging files.
B.
A.